FTP Automation Setup Guide
Version 1.0
March 7, 2006
Introduction
This guide is designed to help PC Support groups setup their users’ Olympus software, IPSwitch Professional FTP client software, and Scribe FTP Automation software to securely send dictation files to Scribe for processing.
Installation Prerequisites
This guide assumes that the following software has already been installed and configured on your computer system:
| 1. | Olympus Dictation Software – this should either be version 4.0 of the software that comes with the 3300 or version 6.0 that comes with the 2300. |
| 2. | IPSwitch WS_FTP Pro 2006 Software – this software should be purchased from www.ipswitch.com and installed by your PC Support group. |
In addition, it is assumed that the computer that the software is installed on has:
| 1. | A permanent connection to the Internet. |
| 2. | Permission to use SSH FTP protocol to connect with an external FTP server through any firewall or router. |
Finally, the software assumes that:
| 1. | The computer has a C: drive |
| 2. | The IPSwitch FTP software was installed in its default location of c:\program files\ipswitch\ws_ftp professional |
These requirements are in addition to the minimum software operating requirement to use Scribe.
Installation Instructions
The Scribe FTP Automation software is supplied on a CD. You can easily copy the files to a floppy disk or network to install should you need to.
To install the system simply do the following:
| 1. | Make a directory on the target PC called c:\ScribeFTP |
| 2. | Copy the files and directories from the CD to the new c:\ScribeFTP |
| 3. | Create a shortcut for the program c:\scribeFTP\PGM\launch.bat on the user’s desktop using the ScribeFTP icon |
The software is now installed. You must then configure the launch.bat file to use with the particular user’s Scribe FTP user ID and password.
Configuration Instructions
To configure the software for this particular user you will need to edit the launch.bat file to enter the user’s Scribe FTP ID and password.
Simply open the launch.bat file in notepad.exe and do the following:
| 1. | replace the word “userid” with the Scribe FTP UserID |
| 2. | replace the word “password” with the Scribe FTP password |
You must then edit the Olympus software so that the program will know where to download the files to once a device has been connected. To do this do the following:
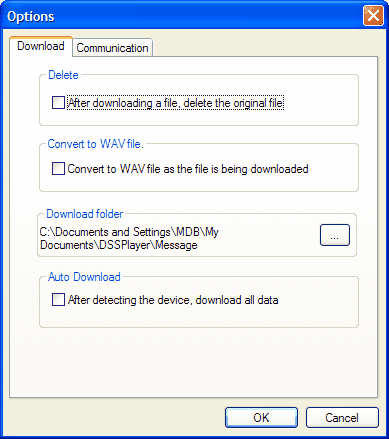
Version 6.0 Software
| 1. | Open the Olympus Software |
| 2. | Click Tools, Options |
| 3. | On the Options Screen the Download Tab change the Download folder to c:\scribeFTP\Olympus |
| 4. | On the options Screen check the Auto Download checkbox so that the device will automatically download all the files after detecting the device. |
Version 4.0 Software
| 1. | Open the Olympus Software |
| 2. | Right Click on Folder A in the download tray |
| 3. | Change the path for the folder A to c:\scribeFTP\Olympus\Message\FolderA by clicking on the move button. |
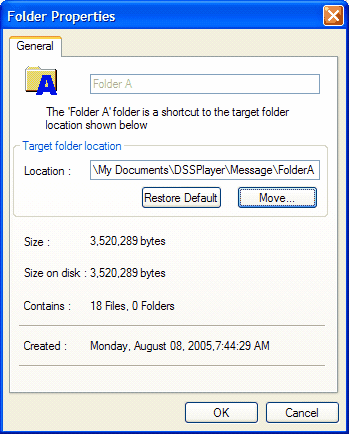
| 4. | Then click OK |
| 5. | Click on Tools, Options, then the Download Tab |
| 6. | Check the box for Auto Download |
| 7. | Check the box for Advanced Download and make the download folder for all audio files to Folder A |
| 8. | Click OK to save your changes |
You are now ready to test the installation using the Operating Instructions below.
Operating Instructions
To upload your dictation files simply follow these steps ONLY ON THE COMPUTER that has been configured for your use:
| 1. | Connect Your Olympus Recorder to the computer with the data cable. (Make sure your recorder is turned on so that the computer will recognize the recorder.) |
| 2. | The computer will download (transfer) all the files from your handheld recorder to your PC. When this is complete you will see (if the setting has been checked) to delete the files from the recorder |
| 3. | Double Click on the Scribe FTP icon on your computer’s desktop. This will start the transfer process. When it is complete you’ll see a browser window that comes up and tells you that your transfer was successful. |
Your files will have been transferred and a copy of them stored on your computer. When you have received the receipt, email from Scribe indicating their receipt, you may then delete these files from your handheld recorder.
Errors
There are two possible error messages you may receive while your computer is transferring your files to Scribe:
| 1. | Connection Error – a browser window will come up and tell you that your computer was not able to connect to Scribe. This may be due to Internet connection issues, or bad user ID/passwords among other things. Please contact your PC Help Desk to request assistance with making sure your Internet access is working properly. |
| 2. | Transfer Error – a browser window will open up and tell you that the transfer of your files was unsuccessful. Again, this usually means that there was a type of connection error between your PC and Scribe. Some of your files may have been transferred, while others not. You should : |
| a. | Check with your PC Support Group to diagnose any connectivity errors and get them corrected. |
| b. | Once any connectivity issues have been fixed or your PC Support Group tells you, you can simply double click on the Scribe FTP icon again and it will retransmit all files again – including those already sent before. |
| c. | Check the receipts you’ll receive from Scribe to make sure all your files have been received. You’ll receive two receipts – the first with what was sent the first time, the second with all files sent along with a message from Scribe indicating that some of the files were previously received. Scribe will simply ignore the duplicate files. |
System Management Information
In order to diagnose problems and ensure that files are transferred properly, the software has built-in error checking, logging, and file archive. Each of these is described below.
Error Checking
The system will check for connection errors and errors in transferring the files. If either of these errors occurs, Internet Explorer windows will pop-up with instructions to contact support.
Logging
The system logs the entire progress of each transmission in a file with the date and time of the transaction. These can be found in the ScribeFTP\Logs folder. Each filename is the date and time that the user executed the program.
The current log is kept in the ScribeFTP\currentlogs folder.
Archive
All successfully transferred dictations are kept in the ScribeFTP\FTPComplete folder. These can be kept as long as desired by the organization. We recommend keeping the files at least until the user confirms via the Scribe email receipt that files were properly transferred.
For More Help
Should you need additional assistance understanding the email receipts or how to locate your dictations status on Scribe, call your Scribe Account Manager.