MS Word - Auto Populate Template Setup Instructions
The Scribe MT platform will auto-populate demographic field data when properties and fields are added to a template. This guide is provided by Scribe to help you set-up your own templates. Scribe also offers this service for an hourly rate.
1. In MS Word, click File>Page Setup, and set your desired margins on the Margins tab. On the Layout tab, be sure to select “Different First Page” and click “OK”
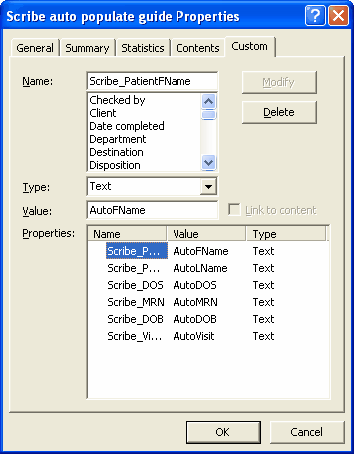
2. To set up auto-populating fields, click File>Properties and then the Custom tab.
3. In the Name field input Scribe_xxx, where xxx is the demographic field that corresponds to the Scribe MT platform as follows:
Demographic field in Scribe MT platform |
For Word’s ‘Name’ field |
Available for auto-population? |
First Name |
Scribe_PatientFName |
Yes |
Last Name |
Scribe_PatientLName |
Yes |
MRN |
Scribe_MRN |
Yes |
Date of Birth |
Scribe_DOB |
Yes |
Visit ID |
Scribe_VisitID |
Yes |
Date of Service |
Scribe_DOS |
Yes |
FullName |
Scribe_Patient |
Yes |
PatientAddress1 |
Scribe_PatientAddress1 |
Check with Scribe Tech Support |
PatientAddress2 |
Scribe_PatientAddress2 |
Check with Scribe Tech Support |
PatientCity |
Scribe_PatientCity |
Check with Scribe Tech Support |
PatientState |
Scribe_PatientState |
Check with Scribe Tech Support |
PatientZip |
Scribe_PatientZip |
Check with Scribe Tech Support |
3. In the Value field, input a descriptive name that will appear as the field placeholder in the template. The descriptive name can be any naming convention meaningful to the transcription team.
In the example that follows, the AutoXxx naming convention was used for the Value field.
4. In the template, place the cursor in the exact location where the demographic field data is to be auto-populated.
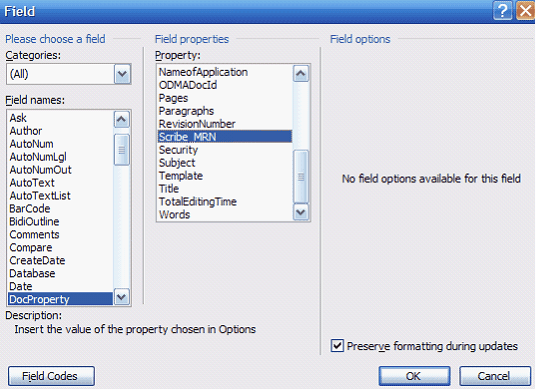
5. Click Insert>Field.
6. In Field names, highlight DocProperty.
7. In Property, highlight the appropriate name, e.g., Scribe_MRN, and click OK.
A sample letter template with auto-populate fields is provided below. Note to see the fields you can hit Alt-F9. This allows you to toggle between displaying the fields and displaying just the field result.
Note: The auto-populate feature is activated by clicking ‘Save’ in the Scribe MT platform.
AutoDOS
Re: AutoLName, AutoFName
MRN: AutoMRN
DOB: AutoDOB
Visit: AutoVisit
Dear Dr. Smith:
Thank you once again for this kind referral. I will continue to keep you informed about his/her progress.
Sincerely,
John Doe, M.D.
Text Signature/Digital Signature Set up Instructions
1. Create a signature in a plain text file or in MSWord.
2. If required, use the following tags as placeholders for approval information. At the time of approval the tags will be filled in.
Tag |
Result |
Scribe_Approver |
Replaced with the name of the person who approved the document. |
Scribe_ApprovalDate |
Replaced with the date the Approve button was hit. |
Scribe_DictationDate |
Replaced with the date the file was recorded by the user. |
Scribe_TranscriptionDate |
Replaced with the date the file was typed by the transcriptionist. |
You can use these tags multiple times in the same signature.
3. By default, the system will add one carriage return to the end of the document before adding the signature. If the user would like more than one carriage return, add the additional carriage returns to the top of the signature file.
4. If the user requires 0 carriage returns or wants exact placement of the signature, build a template with this tag “Scribe_DigitalSig” used as a placeholder. At the time of approval, the signature will replace the tag/placeholder.
5. The user should also specify whether the signature formatting should be kept, or whether the signature should assume the destination formatting. For example, if the signature is created in Times New Roman and they always want it to display this way, this can be set in the database. If the signature should take on the font and formatting of the destination document this can also be set in the database.
6. If the user would like to use a scanned image of an actual signature, the image should be scanned and placed onto a separate word document. Follow directions noted in #4 for placement of this signature. This document should be uploaded separately from other templates.
*Digital signature may be used with or without additional tags.
Patient Chart Template Setup Instructions
If you are using Scribe’s Patient Chart ™ then you can also setup templates to use the information collected about the patient in the chart and automatically create a document.
For example, you can take the notes about the visit, the chief complaint, any observations, problem list and medications and setup a template for a clinic note that will autopopulate with that information when selected. This is a one time replacement. Each time you create a new document, the most current information is replaced in the appropriate places in the template.
To setup the template create the word document as you normally would. Then where you’d like the replacements you can use all the fields from the standard template auto populate method described above. You can also include the Patient Chart fields by simply putting Scribe_XXXX where “XXXX” is the Patient Chart field name where you’d like the replacement to occur in your document.
The following Patient Chart fields are available for direct replacement:
Scribe_Patient – Full Patient Name
Scribe_PFName – Patient First Name
Scribe_PLName – Patient Last Name
Scribe_Subject - Subject
Scribe_MRN – Medical Record Number
Scribe_DOB – Date of Birth
Scribe_VisitID – Visit ID
Scribe_DOS – Date of Service
Scribe_Allergy – Allergy List
Scribe_Immunization – Immunizations List
Scribe_Medication – Medication List
Scribe_Observations – Observations List
Scribe_ProblemList – Problem List
Scribe_Complaint – Chief Complaint
Scribe_Notes - Notes
Scribe_Location – Visit Location
Scribe_VisitDateTime – Visit Date and Time
A sample document can be found below:
____________________________________________________________________________
Date: Scribe_DOS
RE: Scribe_Patient
MRN: Scribe_MRN
Today in our Scribe_Location office we saw Scribe_FName. The patient’s chief complaint was:
Scribe_Complaint
The patient presented with the following problems:
Scribe_ProblemList
We took the following observations during today’s visit:
Scribe_Observations
We also noted that the patient is on these medications:
Scribe_Medication
Sincerely,
Dr. John Smith
_____________________________________________________________________________